Share the Member App with Customers
Overview
Section titled “Overview”Share your e-money with customers and encourage them to become members.
You do not register members yourself. Customers register from the member app on their own device. The only thing you prepare is the member app QR code, or its link, which you get from Share in the app.
That makes it a question of whether customers can find the QR code without effort, which is what drives how fast your member count grows. Choose the delivery that fits how customers move through your shop: printed items next to the register, showing the app screen during service, or a link posted on social media.
You can print promotional items for your shop so customers can easily install the member app.
The printed items are generated automatically with the design you configured.
How Customers Become Members
Section titled “How Customers Become Members”Registration takes four steps.
- You show the member app QR code from Share on Home, or prepare the link or printed items.
- The customer scans the QR code with their smartphone camera and opens the e-money info page.
- The customer adds the member app to their home screen.
- The customer opens the app and registers with a phone number or an email address from Register new account.
Which registration methods are available in step 4 depends on Menu > Member Settings > Login Method. If you turn on an external service such as LINE or Google, customers can also register with a social account, using Continue with LINE or Continue with Google. For how to configure this, see Configure Member Login Methods.
Step 1 is on your side. Everything from step 2 onward is done by the customer. Each step is explained below.
Share the Member App QR Code
Section titled “Share the Member App QR Code”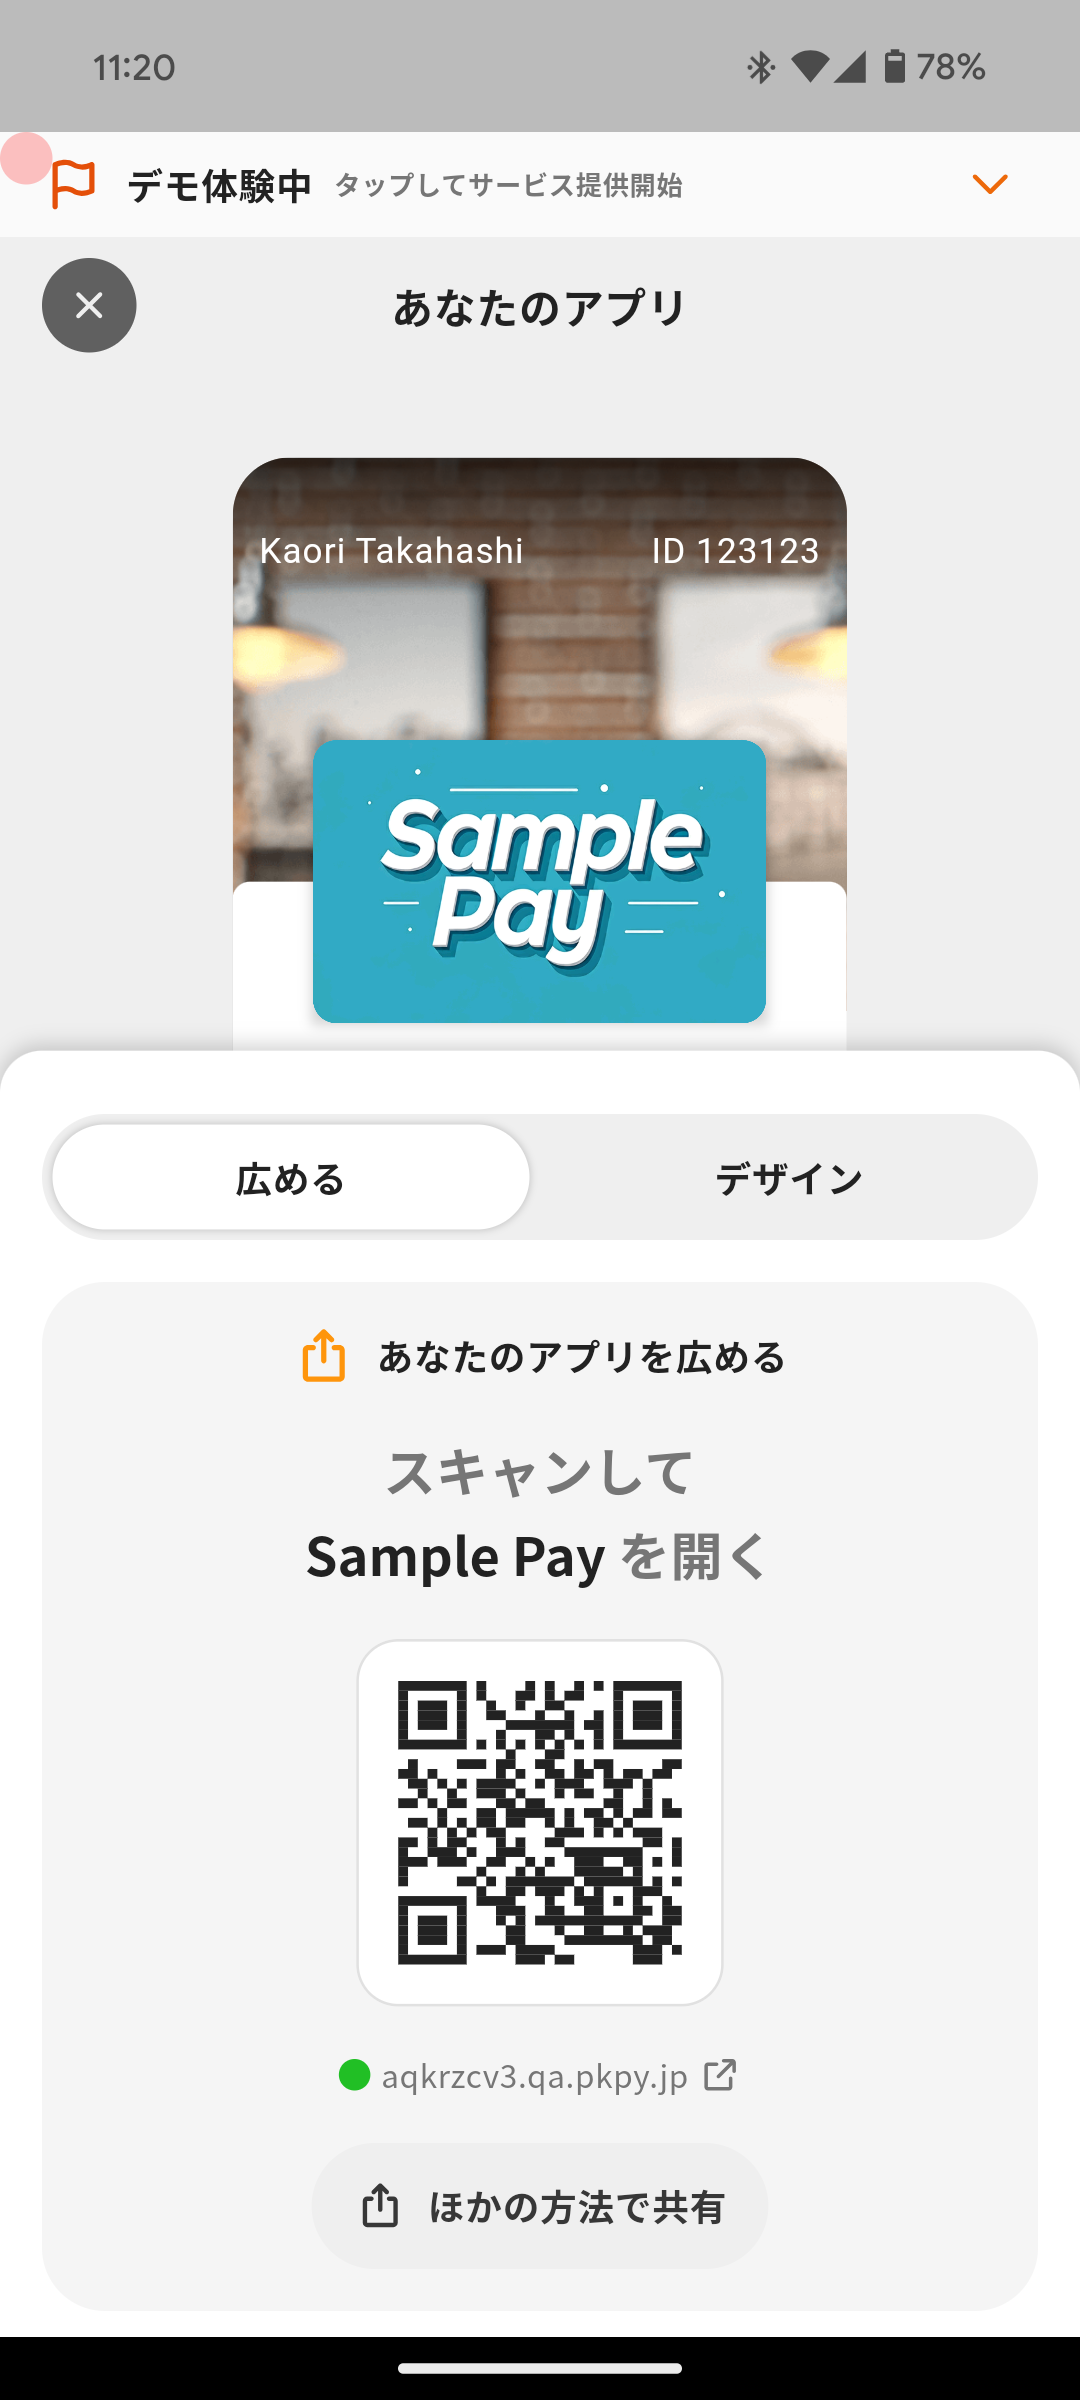
- Tap Share on Home.
- The QR code appears under Share Your App. Ask the customer to scan it with their smartphone camera, or tap Share via Other Methods and choose one of the following options.
The member app URL is shown below the QR code. Tapping the QR code copies that URL.
When a customer is in front of you, showing this screen is all you need.
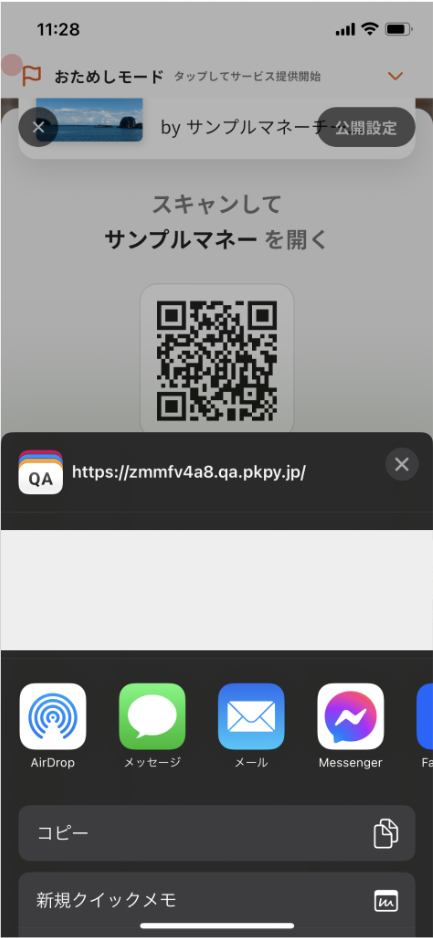
Open Share Menu
Section titled “Open Share Menu”Select any app and share the link.
Open in Browser
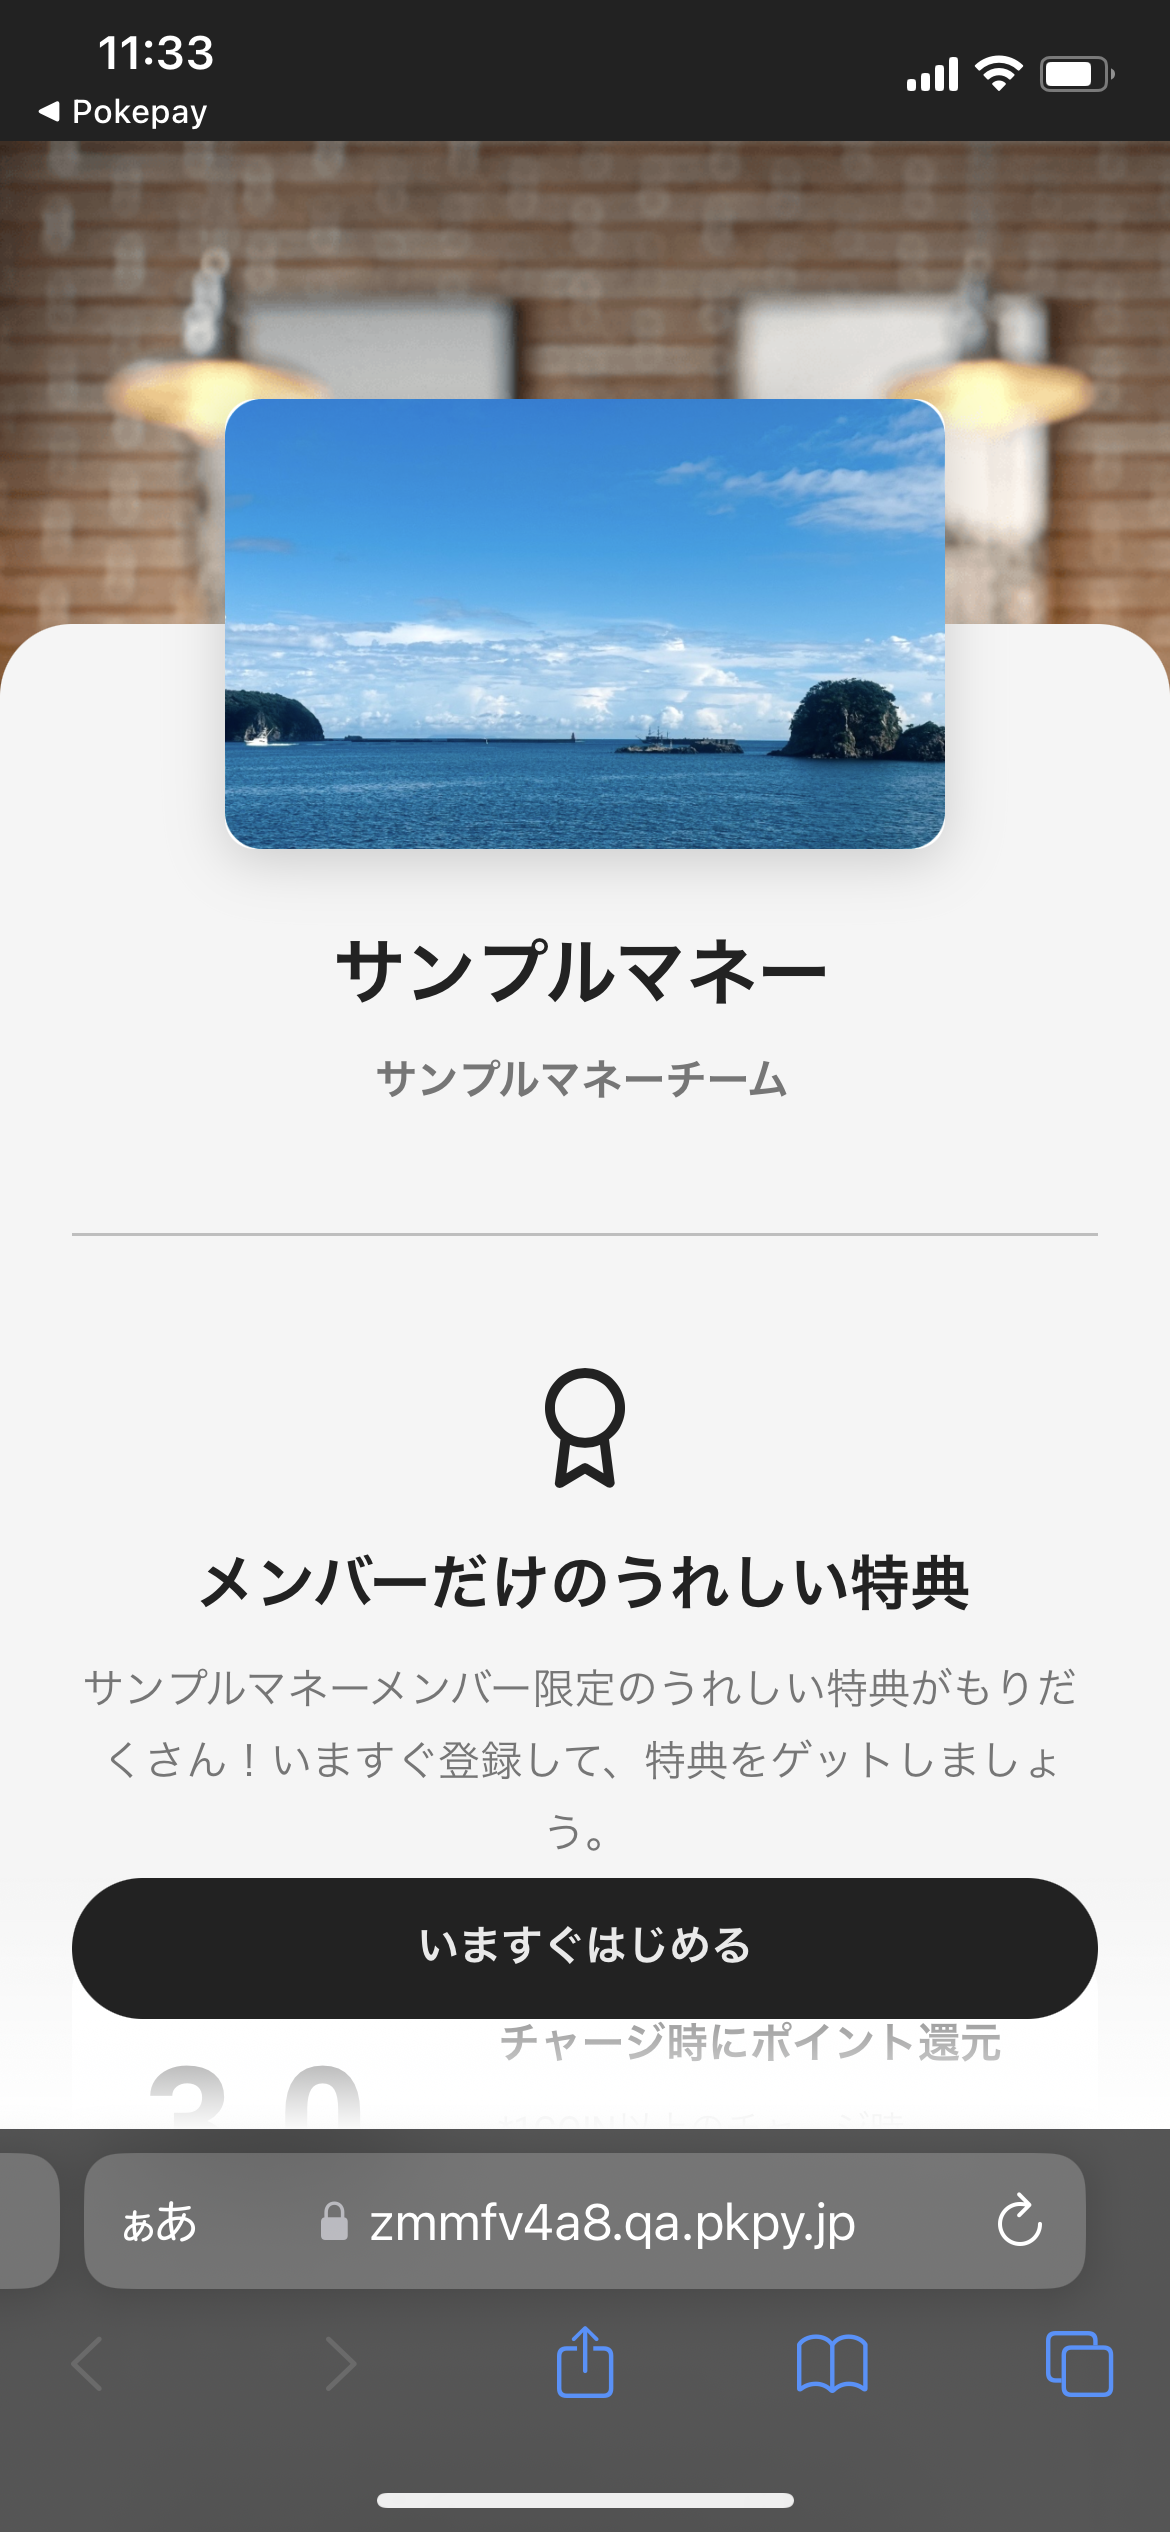
Section titled “Open in Browser”Open the e-money information page in the browser.
Copy Link
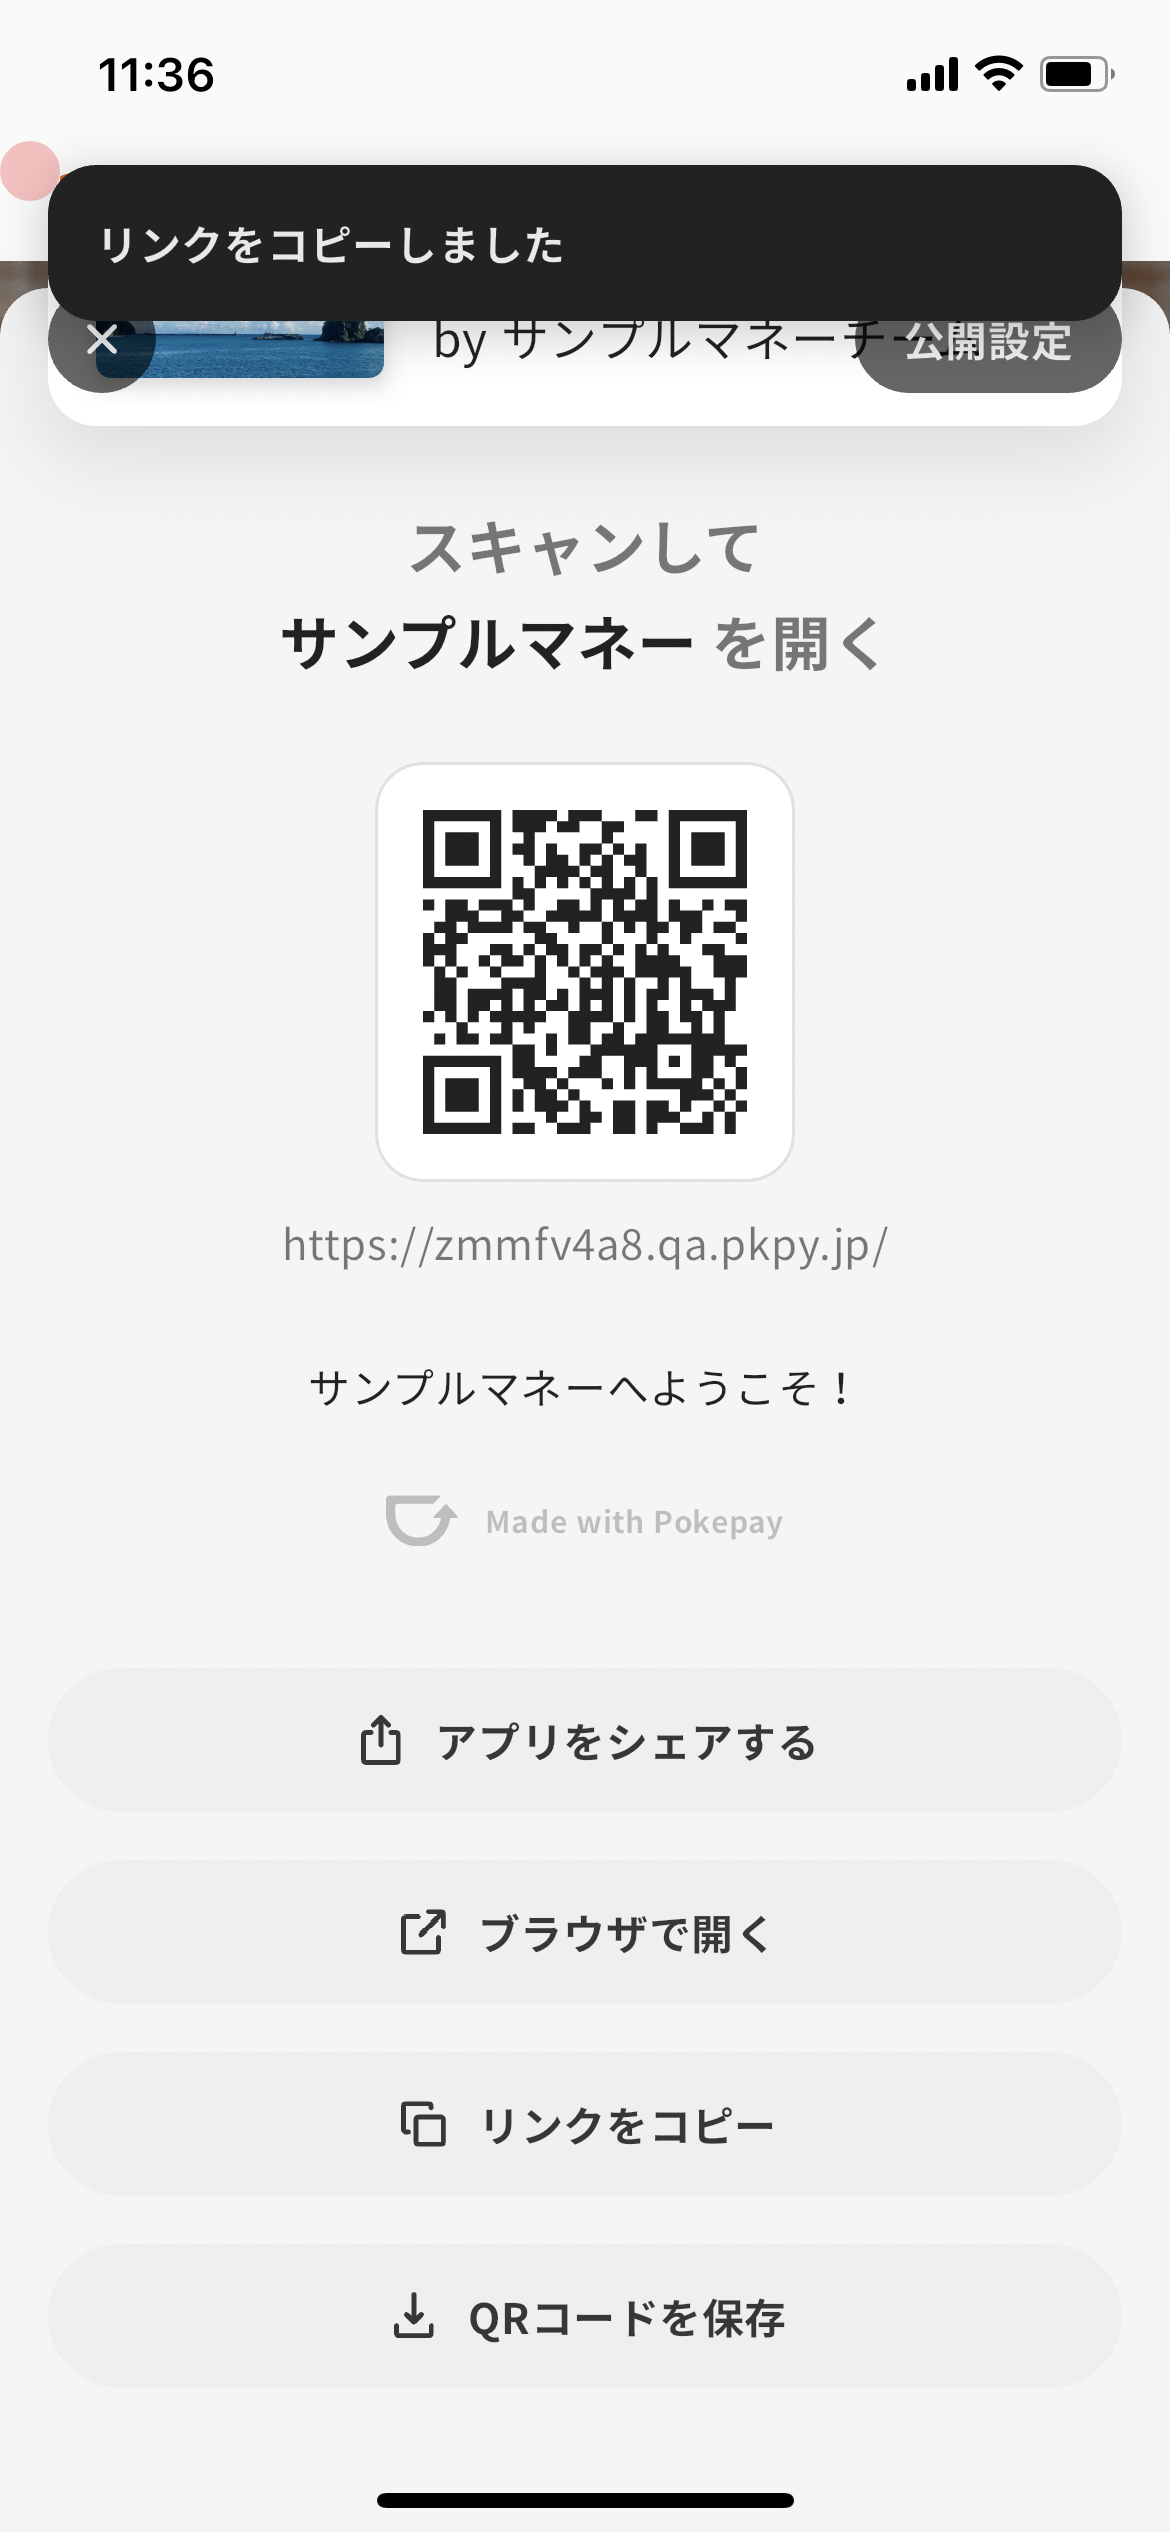
Section titled “Copy Link”Copy the information page URL to the clipboard.
This option is convenient for a LINE Official Account rich menu, Instagram and other social media, or your own website.
Save as QR Code
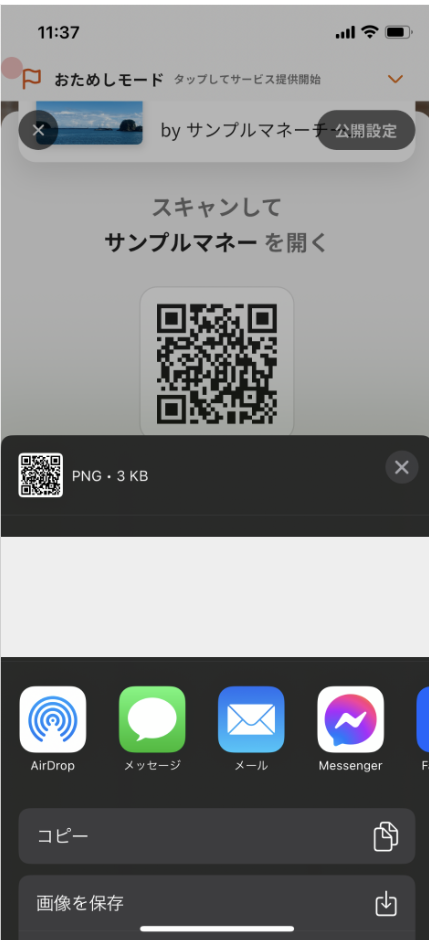
Section titled “Save as QR Code”Save the QR code to the device as an image. Use this when you want to place the QR code on flyers, direct mail, or your website yourself.
Print In-Shop Promotional Items
Section titled “Print In-Shop Promotional Items”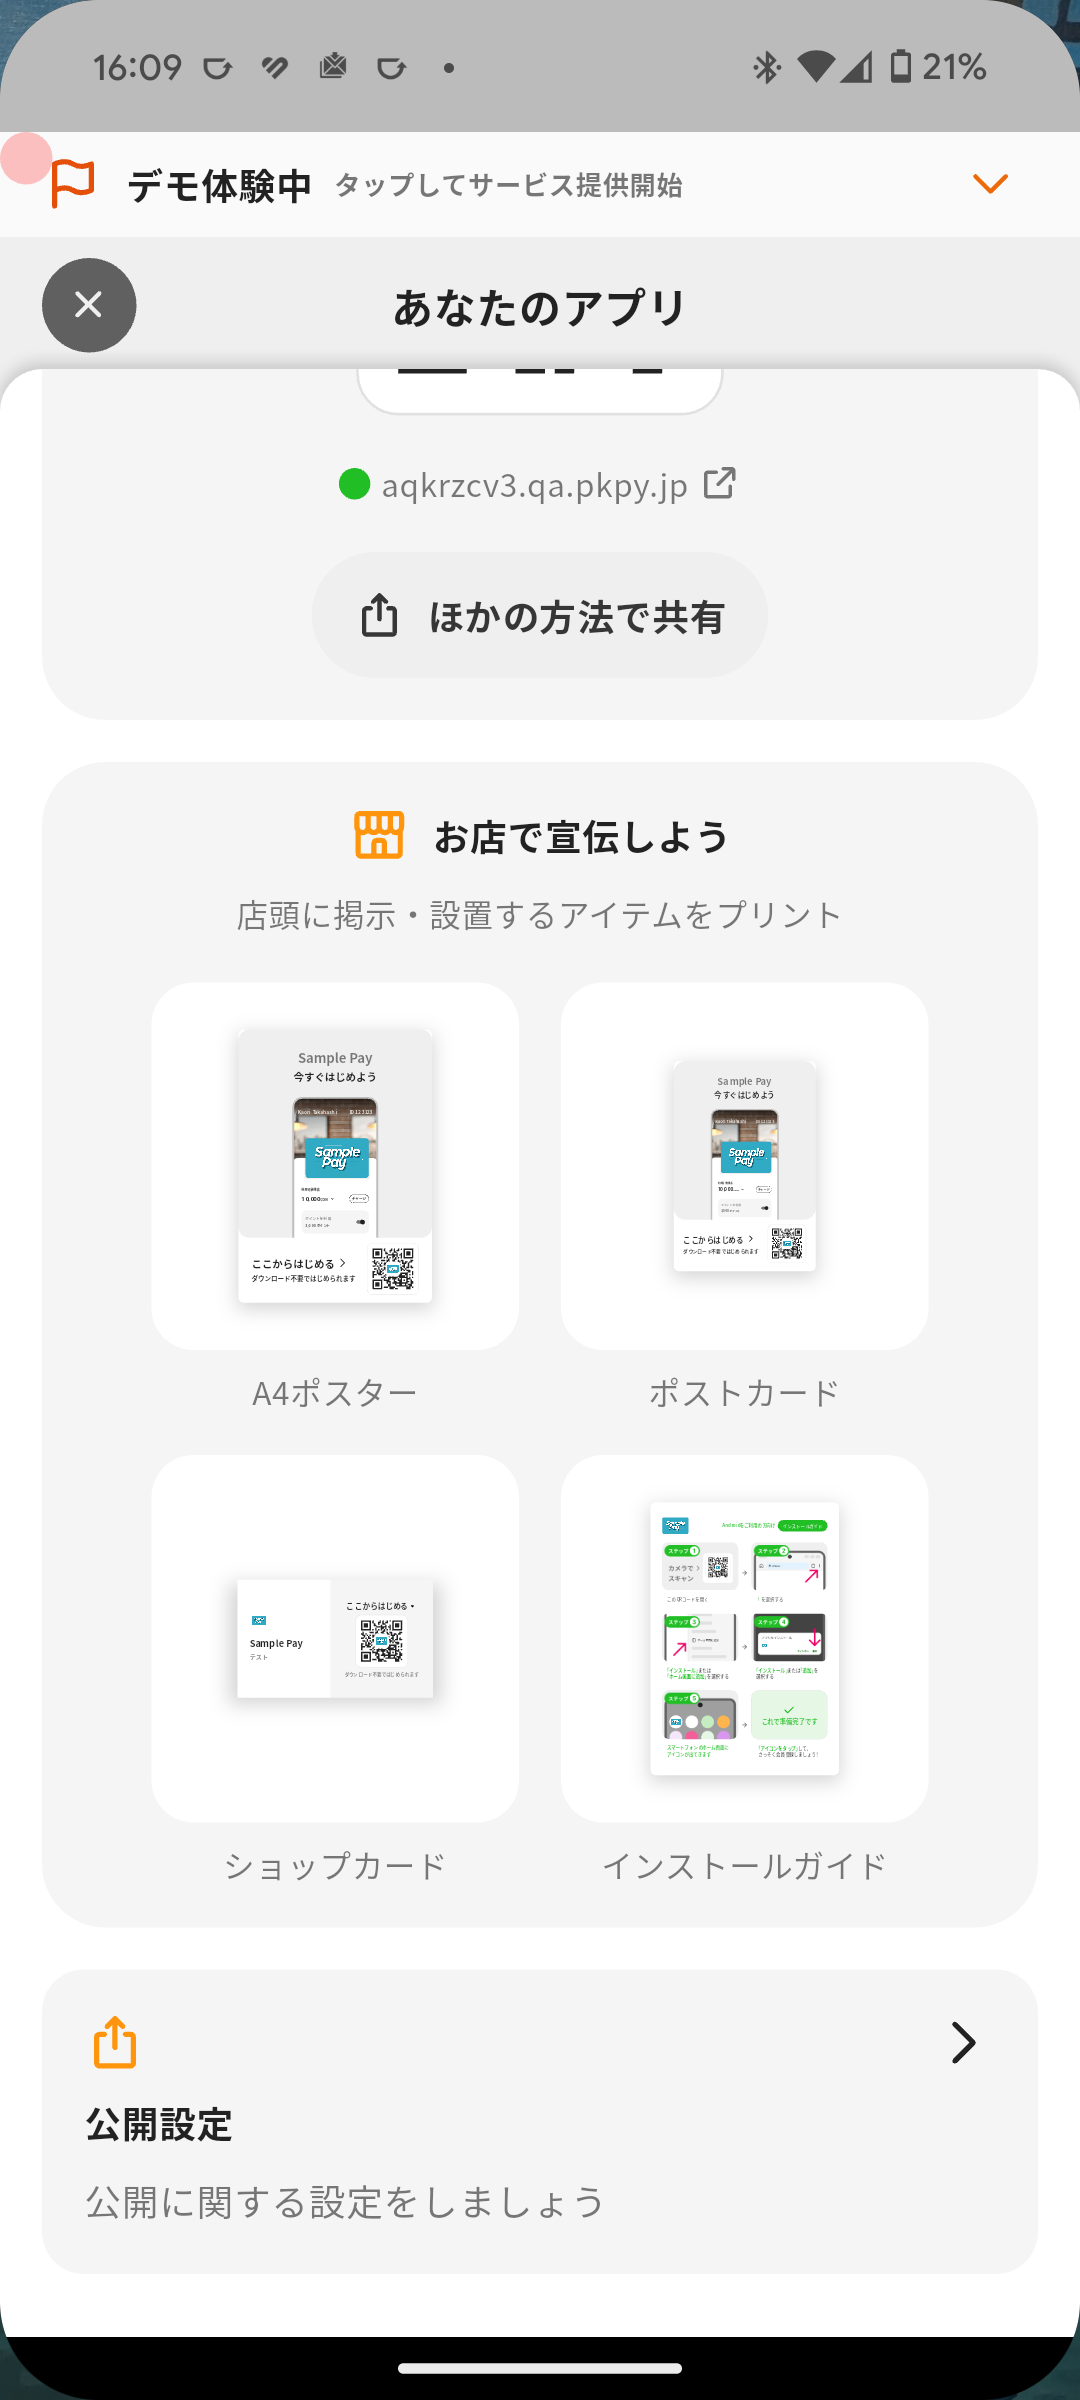
- Tap Share on Home.
- From the Promote In-Shop section, select the item that fits where you will display it.
- A4 Poster
- Post Card
- Shop Card
- Installation Guide
- Check the preview and tap Save to save it as a PDF.
- Print the saved PDF.
Installation Guide also covers the steps for adding the app to the home screen. If many of your customers are not used to this kind of setup, keeping it next to the register reduces questions.
How Customers Register
Section titled “How Customers Register”
Scanning the QR code opens the e-money info page on the customer’s device. Everything from here is done by the customer. Use this section when a customer asks you for help.
1. Open the e-money info page
Section titled “1. Open the e-money info page”Scanning the QR code shows an information page with your e-money introduction, benefits, limit amounts, and other details.
A Become a member button appears at the bottom of the screen.
2. Add the app to the home screen
Section titled “2. Add the app to the home screen”Tapping Become a member shows installation steps that match the customer’s device. Following them adds the app icon to the home screen.
For the exact steps on iPhone and Android, see “Add the App to the Home Screen” below.
💡 You can also let customers use the app without adding it to the home screen
Turning on Enable usage without adding to the home screen in Publish settings lets customers open the app directly from a browser or from LINE. For details, see Allow the App to Open Directly in a Browser.
3. Open the app and tap Register new account
Section titled “3. Open the app and tap Register new account”The customer opens the app from the icon added to the home screen, then taps Register new account on the first screen.
If a screen for choosing a registration method appears, the customer selects the method to use. Only the methods you turned on in Menu > Member Settings > Login Method are listed there.
4. Choose a registration method and enter the details
Section titled “4. Choose a registration method and enter the details”- To register with a phone number, the customer enters a number that can receive SMS and taps Send code.
- To register with an email address, the customer enters the address and taps Continue.
- If you turned on an external service such as LINE or Google, the customer selects Continue with LINE or Continue with Google and follows that service’s authentication screen.
Registering with an external service does not require a verification code, and no SMS fee applies.
You decide which registration methods customers are offered in Configure Member Login Methods. If many of your customers are not used to this kind of setup, an external service means less work for them.
5. Enter the verification code
Section titled “5. Enter the verification code”If the customer registered with a phone number or an email address, they enter the verification code received by SMS or email and tap Continue.
Depending on your e-money settings, additional registration details may be required, such as a name or a second contact method. This also applies when the customer registers with an external service.
Registration is complete at this point. The customer can now charge a balance and make payments.
The customer-facing versions of these steps are also available in Install the app and Create an account. You can share those articles with customers directly.
Add the App to the Home Screen
Section titled “Add the App to the Home Screen”iPhone with Safari
Section titled “iPhone with Safari”- Tap the icon at the bottom of the screen.
- Tap Add to Home Screen.
Keep iOS updated. If Add to Home Screen does not appear even on the latest iOS, restart the app and try again.
iPhone with Chrome
Section titled “iPhone with Chrome”- Tap the icon at the top of the screen.
- Tap Add to Home Screen.
Keep iOS and Chrome updated.
Android with Chrome
Section titled “Android with Chrome”- Tap the icon in the upper-right corner.
- Tap Install app.
- Tap Install.
Android with Other Browsers
Section titled “Android with Other Browsers”This setup is not supported. Open the e-money information page in Chrome and try again.
Some Android devices use their own browser as the default browser. In that case, open the page in Chrome.
If you change the e-money link in Publish settings, the earlier QR code stops working. Replace any QR code you already distributed in print or as an image.
If a customer gets stuck during registration, share the following articles.